Tech Art Crash Course (Part II): Creating an FBX Exporter from Blender to Unreal Engine 5
This blog post covers the remainder of the work that I completed for a technical art course which ran from February 2024 to April 2024. The previous blog post can be found here. To skip to the demo video, click here.
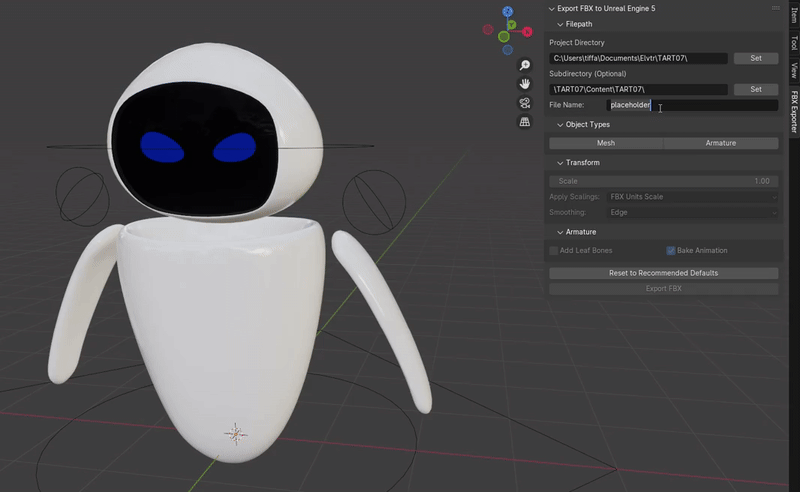
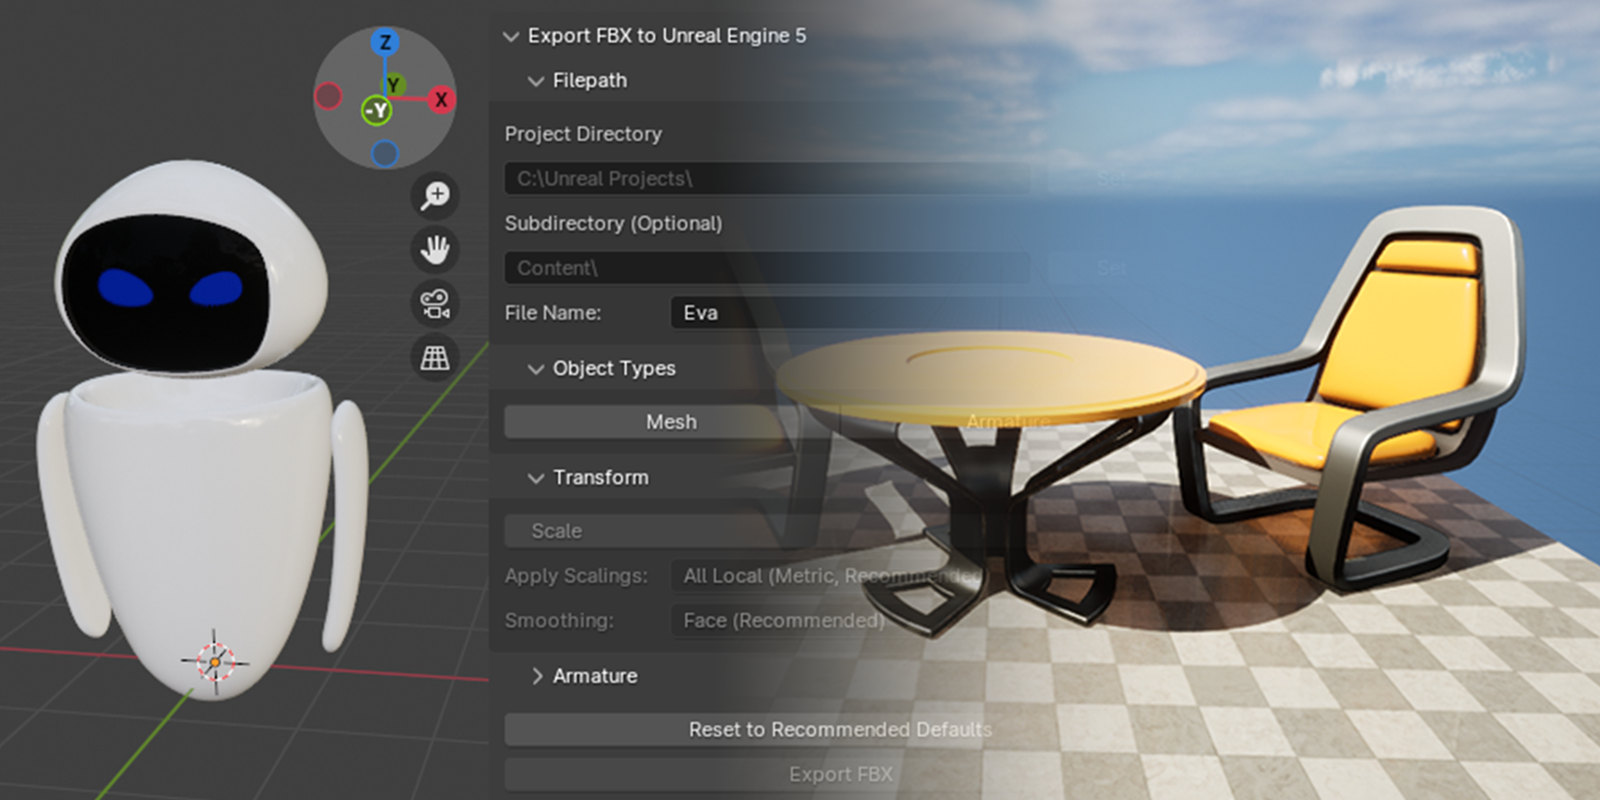
*FBX Exporter Blender Add-on demo.
Background
As the final weeks approached, I was given the choice of building either a Python tool, an Unreal Engine 5 Blueprint, a shader/material, or a Niagara visual effect. Since I was familiar with Python, and because I was not yet fully comfortable with Unreal Engine 5, I decided to opt for the Python tool.
After narrowing down my choices, I was given some suggestions as to what to build, such as an LOD generator, or a file log parser, or an FBX settings manager, et cetera.
Since I wanted to learn more about Blender, I decided to build an FBX exporter for Blender (in the form of a Blender Add-on), with Unreal Engine 5 as the destination for an outbound FBX.
Unit Conversion
One important issue that I wanted to address was the unit system mismatch between Blender and Unreal Engine 5. In order for the FBX exporter to be effective, it needed to convert between units in addition to exporting the actual FBX.
The default unit of measurement in Blender (see the Blender documentation) is one meter, assuming that the unit system setting under the Scene Properties tab is set to either “None” or “Metric”. Meanwhile, the default unit of measurement in Unreal Engine 5 is one centimeter, assuming that Unreal’s unit system settings remain unchanged:
| Software | Unit System | Length Unit |
|---|---|---|
| Blender | None (Blender Units), Metric | Meter (apply a 0.01 multiplier to convert to centimeters) |
| Unreal Engine 5 | Metric | Centimeter (the target unit) |
Modeling at Scale
Assuming that Blender’s scene length unit has not been changed to centimeters, and assuming that the unit scale has not been changed to 0.01, an asset (such as a coffee mug) from Blender could appear within Unreal Engine 5 at 100 times the intended scale:
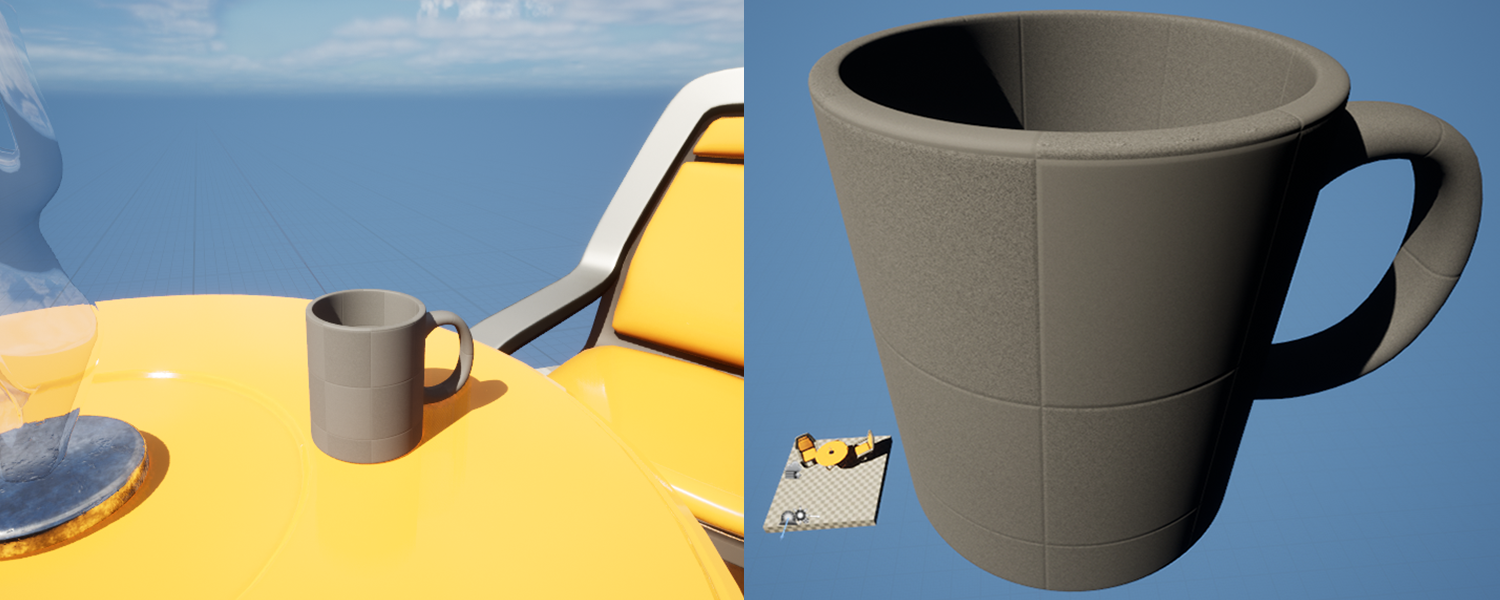
*Coffee mug imported into Unreal at the correct scale (left) and incorrect scale (right).
Requirements
I was granted the go-ahead to build my exporter, under the conditions that it was similar in complexity to the batch renamer from the previous assignment, and that it had a GUI with three or more meaningful options for the user to configure.
It was imperative that the exporter could do at least the following:
- Get a valid filepath for a target folder - to start things out, this could be the
Content\folder of an Unreal project - Append the name of the FBX file to the filepath
- Export and place the FBX in the target folder
Meaningful Options
A Blender user should be able to:
- Set a custom FBX filename. If not specified, then the filename should be the
.blendfilename by default - Set a valid subdirectory to send the FBX file to. For example, send a
Suzanne.fbxto theMesh\subdirectory under theContent\folder - Apply a scale transform to the output FBX. This would be a 0.01 multiplier by default, unless changed
- Select a mesh to export, or an armature (for animation), or both
For the fourth option, I wanted to support the mesh and armature object types after looking into a video which covered ideal FBX export settings for Unreal Engine 5. The next section goes over these object types in further detail.
Research
I had not written a Blender Add-on before, and so did a YouTube search on the topic. I found the following videos to be hugely useful for initial setup:
- Create a Custom Blender Panel with Less Than 50 Lines of Python Code: https://www.youtube.com/watch?v=Qyy_6N3JV3k
- How to Install Addons in Blender: https://www.youtube.com/watch?v=vYh1qh9y1MI
I also searched for existing exporters from Blender to Unreal, as the unit system mismatch issue had likely been addressed before. I was able to find a Blender Add-on named Send to Unreal (maintained by Epic Games), as well as a video describing the difference between it and the built-in exporter:
- Send to Unreal: https://epicgamesext.github.io/BlenderTools/send2ue
- Send to Unreal VS FBX Export: https://www.youtube.com/watch?v=y51-tXjKEzc
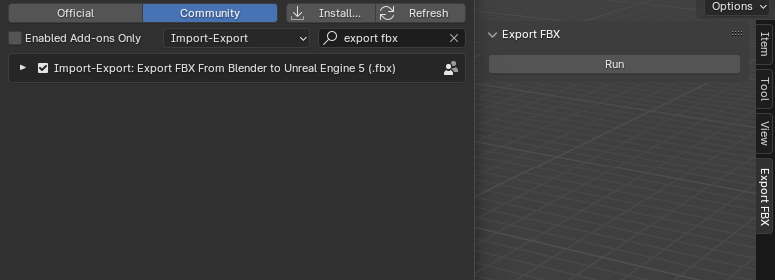
Add-on Installation
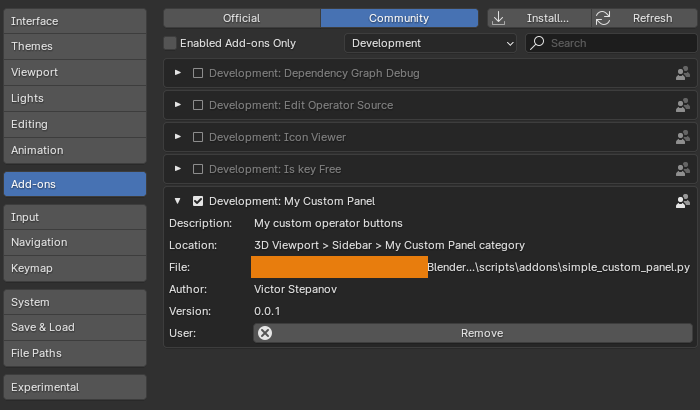
I made sure that I could install and uninstall a Blender Add-on after looking over the first video (credits to Victor Stepanov). With the
included simple_custom_panel.py file,
I navigated to Blender’s Edit > Preferences menu, clicked on the Add-ons section and Community tab, and clicked on the “Install” button to open a file browser and find
the Python file.
Then, I installed and activated the example Add-on:
Blender Python API
Continuing on from the Edit > Preferences menu and Interface section, I enabled some developer-friendly features such as User Tooltips and
Python Tooltips:
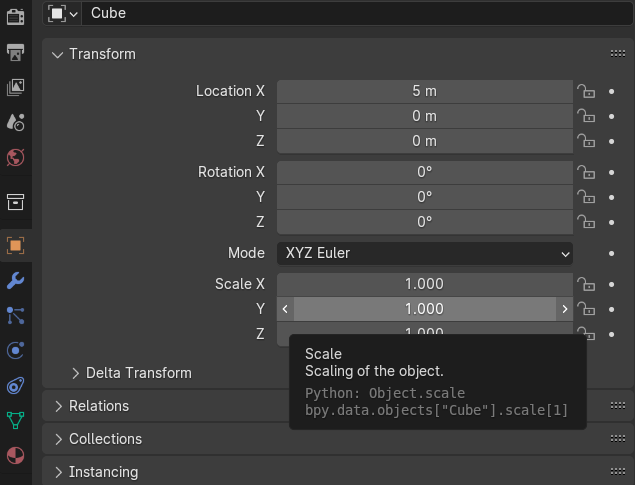
*Hovering over the Scale Transform Y attribute of the default cube to view the user tooltip and Python tooltip.
I made sure that I could access the scale attribute listed in the Python tooltip, by navigating to the Python console (under Blender’s Scripting workspace tab), and then entering the following commands to halve the dimensions of the default cube:
c = bpy.data.objects['Cube']
c.scale = Vector((0.5, 0.5, 0.5))
The Built-in Exporter
I tried out the default exporter to better understand the settings I needed to change for Unreal. I navigated to the File > Export > FBX menu to open the built-in dialog,
and set the target folder to the Content\ folder of an Unreal Project. Then, I clicked the “Export FBX” button without adjusting the default settings - this caused Unreal to show a warning on FBX import:
No smoothing group information was found in this FBX scene.
Afterwards, I made a few changes to the export settings (with help from this video which covers ideal FBX export settings for Unreal). I checked Selected Objects, reduced the list of possible object types to “Mesh” and “Armature”, and set the Smoothing type to “Face” instead of “Normals Only”. These revised settings allowed Unreal to import the default cube without issues:

*Adjusted settings for Blender's built-in FBX Exporter.
Implementation
First, I needed the Python command which mapped to the export operation as shown above, or export_scene.fbx. I determined the list of inputs which were relevant to the project requirements:
bpy.ops.export_scene.fbx(filepath='', global_scale=1.0, apply_unit_scale=True, apply_scale_options='FBX_SCALE_NONE',
                         use_selection=False, object_types={'ARMATURE', 'CAMERA', 'EMPTY', 'LIGHT', 'MESH', 'OTHER'},
                         mesh_smooth_type='OFF')
Following the example code from the first video, I set up the necessary code to add a panel to the sidebar of the 3D viewport:
import bpy

bl_info = {
    "name": "Export FBX From Blender to Unreal Engine 5 (.fbx)",
    "category": "Import-Export",
}

class MainPanel(bpy.types.Panel):

    bl_space_type = "VIEW_3D"
    bl_region_type = "UI"
    bl_category = "Export FBX"
    bl_label = "Export FBX"

def register():
    bpy.utils.register_class(MainPanel)

def unregister():
    bpy.utils.unregister_class(MainPanel)

# Run the script directly from Blender's
# Text Editor without installing the add-on
if __name__ == "__main__":
    register()
I modified the MainPanel class definition, and set up one button labeled “Run” to execute export_scene.fbx when clicked:
class MainPanel(bpy.types.Panel):
    ...
    def draw(self, context):
        self.layout.operator('export_scene.fbx', text='Run')
I made sure that I could install this Python file as a Blender Add-on, and that the panel was visible. I confirmed that clicking on the “Run” button opened a dialog for the built-in exporter:
*Installed Add-on and Minimal GUI.
From here, I needed to pass some input arguments, such as the filepath, to export_scene.fbx. I determined that I needed a custom
operator which would appear as a button in the Blender Add-on GUI, and would
perform additional steps before executing export_scene.fbx on click.
The Export Operator
I defined a new subclass of bpy.types.Operator, and overrode its execute() method. I registered my new Operator subclass with
Blender, moved the text label into the bl_label property, and set a unique bl_idname so that my Panel subclass would be able to discover it:
class ExportOperator(bpy.types.Operator):

    '''Export the FBX'''
    bl_idname = "export_scene.custom_fbx"
    bl_label = "Run"

    def execute(self, context):
        return {'FINISHED'}
class MainPanel(bpy.types.Panel):
    ...
    def draw(self, context):
        self.layout.operator('export_scene.custom_fbx')
For the execute() method body, I needed to name the FBX after the currently opened Blender file. I extracted the filename
with the help of bpy.data.filepath
and bpy.path.basename. Then, I hardcoded a filepath with
the filename and .fbx extension, and sent it to export_scene.fbx as its first input argument:
class ExportOperator(bpy.types.Operator):
    ...
    def execute(self, context):

        bpath = bpy.data.filepath
        [stem, ext] = os.path.splitext(bpy.path.basename(bpath))

        filepath = os.path.join('C:\\', 'Unreal Projects', 'MyProject', 'Content', stem + '.fbx')
        bpy.ops.export_scene.fbx(filepath=filepath)

        self.report({'INFO'}, f"Export {filepath}")
        return {'FINISHED'}
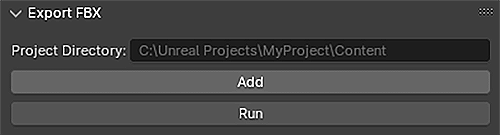
User-Defined Filepath
Once the custom operator could be called without issue, I replaced the hardcoded filepath with a user-defined filepath to send to export_scene.fbx.
After learning more about custom properties in Blender, I added one
StringProperty to the current
scene to store a user-defined string value:
bpy.types.Scene.project_dir = bpy.props.StringProperty(
    name="Project Folder",
    description="Unreal Engine 5 project folder",
)
I added this StringProperty to my panel layout in the 3D viewport, which appeared as an edit field in my Blender Add-on GUI:
placeholder = os.path.join('C:\\', 'Unreal Projects', 'MyProject', 'Content')
self.layout.prop(context.scene, "project_dir", placeholder=placeholder)
And replaced the hardcoded filepath with the new value:
filepath = os.path.join(context.scene.project_dir, stem + '.fbx')
The File Select Operator
Still, I needed some way to open a file browser and assign the selected filepath to the project_dir to make the Blender Add-on easier to use.
I registered a second operator to do this:
class ProjectPathOperator(bpy.types.Operator):

    '''Set the Unreal Engine 5 Project Folder'''
    bl_idname = 'export_scene.project_dir'
    bl_label = "Add"

    # select directories
    directory: bpy.props.StringProperty()

    # show only directories
    filter_folder: bpy.props.BoolProperty(
        default=True,
        options={"HIDDEN"}
    )

    def invoke(self, context, event):
        context.window_manager.fileselect_add(self)
        return {'RUNNING_MODAL'}

    def execute(self, context):
        context.scene.project_dir = self.directory
        return {'FINISHED'}
And added this operator to my panel layout in the 3D viewport, which appeared as an clickable button in my Blender Add-on GUI:
self.layout.operator('export_scene.project_dir')

*Before and after layout adjustments.
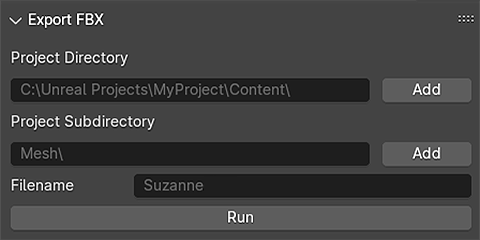
Subdirectory and Filename
I repeated the steps above by adding two additional instances of StringProperty, and made sure that the export operator could append a
subdirectory and filename to the existing filepath. I displayed the subdirectory in particular as a relative path:
class ProjectSubPathOperator(bpy.types.Operator):

    '''Set the Unreal Engine 5 Project Subdirectory'''
    bl_idname = 'export_scene.project_subdir'
    bl_label = "Add"
    ...
    def execute(self, context):

        commonpath = os.path.commonpath(
            [context.scene.project_dir, self.directory]) + os.sep

        # display relative directory
        rel_project_subdir = self.directory.replace(commonpath, '')
        context.scene.project_subdir = rel_project_subdir

        return {'FINISHED'}
And updated the panel layout with the new fields:
Dynamic Property Group
To keep things organized, I moved the StringProperty instances into a
PropertyGroup - I registered my new class, and attached a
PointerProperty to the current scene
to maintain a reference to the PropertyGroup:
class ExportPropertyGroup(bpy.types.PropertyGroup):
    project_dir: bpy.props.StringProperty(
        name="Project Folder",
        description="Unreal Engine 5 project folder",
    )
    ...
    # subdirectory and filename properties
def register():
    ...
    bpy.utils.register_class(ExportPropertyGroup)
    bpy.types.Scene.io_ue5_fbx = bpy.props.PointerProperty(type=ExportPropertyGroup)

def unregister():
    ...
    bpy.utils.unregister_class(ExportPropertyGroup)
    del bpy.types.Scene.io_ue5_fbx # cleanup
I also made sure to update StringProperty access throughout my script, now that the PropertyGroup had ownership:
class ExportOperator(bpy.types.Operator):
    ...
    def execute(self, context):
        io_ue5_fbx = context.scene.io_ue5_fbx
        project_dir = io_ue5_fbx.project_dir
        project_subdir = io_ue5_fbx.project_subdir
        stem = io_ue5_fbx.filename
        ...
        filepath = os.path.join(project_dir, project_subdir, stem + '.fbx')
class MainPanel(bpy.types.Panel):
    ...
    def draw(self, context):
        placeholder = os.path.join('C:\\', 'Unreal Projects', 'MyProject', 'Content')
        self.layout.prop(context.scene.io_ue5_fbx, "project_dir", placeholder=placeholder)
        ...
Scale Transform
For the scale transform factor, I added a FloatProperty
to my PropertyGroup to hold a numerical value, with 0.01 as the default:
class ExportPropertyGroup(bpy.types.PropertyGroup):
    scale: bpy.props.FloatProperty(
        name="Scale",
        description="Scale Factor",
        precision=2,
        default=0.01,
        soft_min=0,
        soft_max=10,
    )
    ...
    # previously defined properties
Selected Objects
For the selected object types, I added two instances of BoolProperty
to keep track of whether or not to export a mesh, an armature, or both:
class ExportPropertyGroup(bpy.types.PropertyGroup):
    mesh: bpy.props.BoolProperty(
        name="Mesh",
        description="Export the selected mesh",
        default=False,
    )
    armature: bpy.props.BoolProperty(
        name="Armature",
        description="Export the selected armature",
        default=False,
    )
    ...
    # previously defined properties
Smoothing Type
For the smoothing information, I created an EnumProperty
to stand in for one of three separate options, and set the default option to “Face”:
class ExportPropertyGroup(bpy.types.PropertyGroup):
    smoothing: bpy.props.EnumProperty(
        name="Smoothing",
        description="Export smoothing information",
        default="FACE",
        items=[
            ("FACE", "Face (Recommended)", "Write face smoothing"),
            ("EDGE", "Edge", "Write edge smoothing"),
            ("OFF", "Normals Only", "Export only normals instead of writing edge or face smoothing data"),
        ],
    )
    ...
    # previously defined properties
Panel Layout
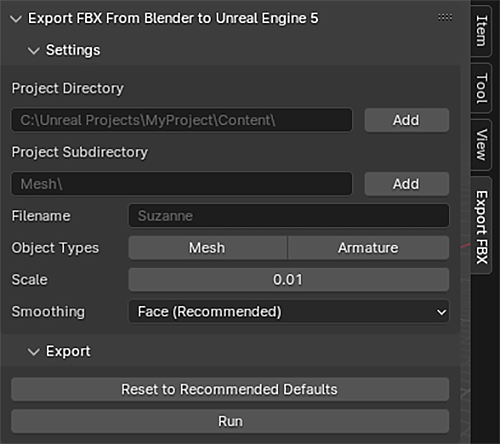
I added one more operator to my panel labeled “Reset to Recommended Defaults” to allow a user to revert the filename, selected object types, scale factor, and smoothing options to their default values.
Then, I finalized the overall layout by moving properties/operators related to filepath configuration and export settings under a “Settings” subpanel, and kept the remaining operators under an “Export” subpanel:
Validation
To show my Add-on under the conditions that the selected objects
in the current scene included at least one mesh and/or armature, I decided to monitor the state of the selected objects with help from
bpy.types.Panel.poll and
bpy.context.selected_objects:
class MainPanel(bpy.types.Panel):
    ...
    @classmethod
    def poll(cls, context):
        '''
        Decide whether or not to show the tool based on context
        '''
        obj_types = ['MESH', 'ARMATURE']
        found = False

        # check selected objects
        for obj in context.selected_objects
            if (obj.type in obj_types):
                found = True
                break

        return found
    ...
I also made sure to enable the “Run” button, given a valid filepath. In all other cases, I decided to grey out the button:
def update_project_dir(self, context):
    if (not os.path.isdir(self.project_dir)):
        print(f"Invalid filepath: {self.project_dir}")

class ExportPropertyGroup(bpy.types.PropertyGroup):
    project_dir: StringProperty(
        name="Project Folder",
        description="Unreal Engine 5 project folder",
        update=update_project_dir
    )
    ...
    # previously defined properties
class ExportPanel(bpy.types.Panel):
    ...
    def draw(self, context):
        ...
        row = self.layout.row()
        row.operator('export_scene.custom_fbx')
        if (not os.path.isdir(context.scene.io_ue5_fbx.project_dir)):
            row.enabled = False
Export to Unreal
Finally, I passed the user-defined arguments from the GUI into Blender’s export_scene.fbx:
class ExportOperator(bpy.types.Operator):

    '''Export the FBX'''
    bl_idname = "export_scene.custom_fbx"
    bl_label = "Run"

    def execute(self, context):

        io_ue5_fbx = context.scene.io_ue5_fbx

        # filepath ------------------------------------------- #

        project_dir = io_ue5_fbx.project_dir
        project_subdir = io_ue5_fbx.project_subdir

        if (io_ue5_fbx.filename):
            stem = io_ue5_fbx.filename
        else:
            bpath = bpy.data.filepath
            [stem, _] = os.path.splitext(bpy.path.basename(bpath))

        filepath = os.path.join(project_dir, project_subdir, stem + '.fbx')

        # rest of the settings ------------------------------- #

        global_scale = io_ue5_fbx.scale
        apply_unit_scale = True
        apply_scale_options = 'FBX_SCALE_NONE'

        use_selection = True
        object_types = set()

        if (io_ue5_fbx.mesh):
            object_types.add('MESH')
        if (io_ue5_fbx.armature):
            object_types.add('ARMATURE')

        mesh_smooth_type = io_ue5_fbx.smoothing

        # export ---------------------------------------------- #

        bpy.ops.export_scene.fbx(filepath=filepath,
                                 global_scale=global_scale,
                                 apply_unit_scale=apply_unit_scale,
                                 apply_scale_options=apply_scale_options,
                                 use_selection=use_selection,
                                 object_types=object_types,
                                 mesh_smooth_type=mesh_smooth_type)

        self.report({'INFO'}, f"Export {filepath}")

        return {'FINISHED'}
Demo
Below are some screen recordings of the completed FBX Exporter Blender Add-on, with a free 3D model from CGTrader.
Since the 3D model did not come with a rig, I made a quick character rig to test out the Blender Armature: